Professional boat rigger Andy Kratochvil of Fishlectronics walks us through a detailed step-by-step fish finder installation covering everything from the initial unboxing and parts layout, transducer placement and mounting, to wiring up the head unit. Although the featured graph is a Humminbird SOLIX, Andy’s tips and tricks are aimed squarely
A Fundamental Danger Of NMEA 2000 Networks
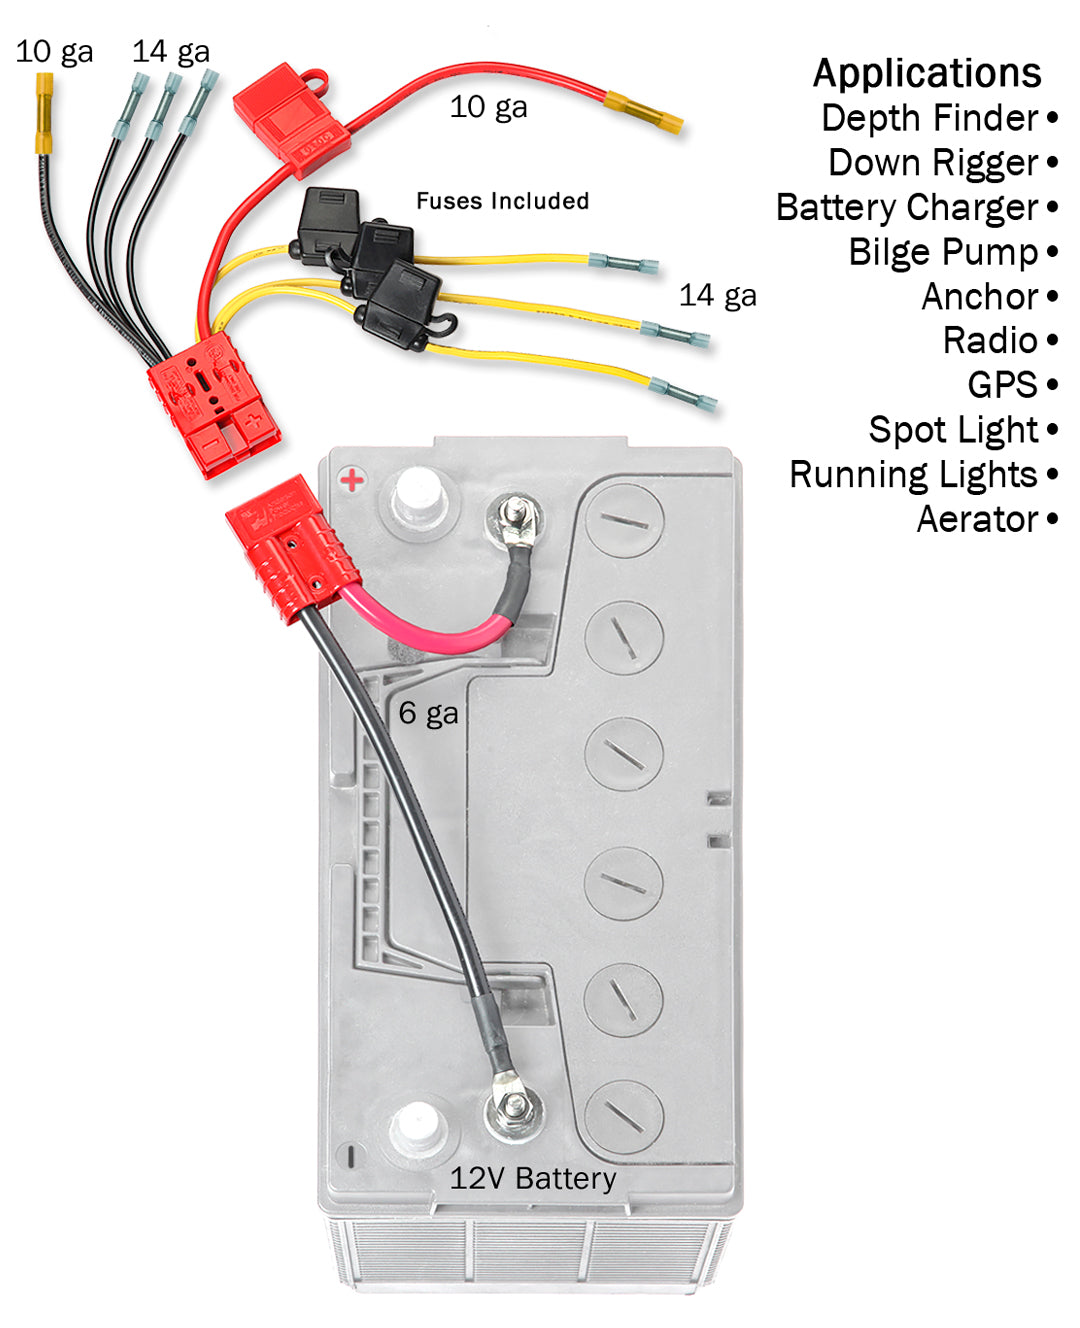
To install battery wires, first, ensure that the battery is disconnected. Then, strip the insulation from the ends of the wires and attach them to the appropriate terminals on the battery. Finally, tighten the nuts on the terminals to secure the wires in place. Be sure to check the manufacturer’s instructions for your specific battery for any

Source Image: m.youtube.com
Download Image
Step 5: Crimp the Wires into Place. After that, insert one of the wires into the matching terminal. Use your crimping tool to clamp the wire into the connector before repeating with the other wire. These connectors can only be used once, so if this fuse tap has been used before, you will need to buy new wire connectors.

Source Image: noyafa.com
Download Image
Just another WordPress site | Surf fishing rigs, Fishing rigs, Surf fishing Here is some tips to help you. Termination of wires. One of the most important steps in a complete and lasting fish finder installation is the quality of wire termination. Mount the fishfinder. Be sure to mount your fish finder in a way that holds up to the rigors of fishing trips and rough water. Wrap it all up.
Source Image: connect-ease.com
Download Image
Wiring A Fish Finder
Here is some tips to help you. Termination of wires. One of the most important steps in a complete and lasting fish finder installation is the quality of wire termination. Mount the fishfinder. Be sure to mount your fish finder in a way that holds up to the rigors of fishing trips and rough water. Wrap it all up. Step 4: Testing it all out. Your transducer is secured, you’ve run all your wires up to your newly mounted fish finder, and you’re ready to take your new setup out on the water. Most of what we’ve done is fairly simple to reverse, so make adjustments if you need to. Enjoy your new setup, and happy fishing!
12V Multi-Application Trolling Motor Electronics Connection Kit/w Fuses – Connect-Ease. Get Connected Connect all your outdoor equipment with ease.
Nov 8, 2023Connect the wires as follows (to the spare fuse in the fuse box): Connect the positive (red) wire to the power lead on the fish finder. Connect the negative (black) wire to a ground point on the fish finder. Attach the other end of the power lead to the fuse box (or circuit breaker panel). Crimp the wires into place. How to Install a Fish Finder | Pro Tips and Tricks for All Models – YouTube
Source Image: m.youtube.com
Download Image
Round Base Fish Finder Mount with Track Mounted LockNLoad™ Mounting System – Black – Ramsey Outdoor Nov 8, 2023Connect the wires as follows (to the spare fuse in the fuse box): Connect the positive (red) wire to the power lead on the fish finder. Connect the negative (black) wire to a ground point on the fish finder. Attach the other end of the power lead to the fuse box (or circuit breaker panel). Crimp the wires into place.

Source Image: ramseyoutdoor.com
Download Image
A Fundamental Danger Of NMEA 2000 Networks Professional boat rigger Andy Kratochvil of Fishlectronics walks us through a detailed step-by-step fish finder installation covering everything from the initial unboxing and parts layout, transducer placement and mounting, to wiring up the head unit. Although the featured graph is a Humminbird SOLIX, Andy’s tips and tricks are aimed squarely
Source Image: morganscloud.com
Download Image
Just another WordPress site | Surf fishing rigs, Fishing rigs, Surf fishing Step 5: Crimp the Wires into Place. After that, insert one of the wires into the matching terminal. Use your crimping tool to clamp the wire into the connector before repeating with the other wire. These connectors can only be used once, so if this fuse tap has been used before, you will need to buy new wire connectors.

Source Image: pinterest.com
Download Image
Fish Finders – Tagged “Wireless Sensor” – Gain Express Mar 17, 2022Step 6 – Run The Power Cabling. Take the power cables and run them from your fish finder to your cranking battery/fuse box. Run them through the exit and entry holes you drilled in Step 4. Check to see if you need to shorten or lengthen the wires.

Source Image: gainexpress.com
Download Image
How to Install a Fish Finder | Pro Tips and Tricks for All Models – YouTube Here is some tips to help you. Termination of wires. One of the most important steps in a complete and lasting fish finder installation is the quality of wire termination. Mount the fishfinder. Be sure to mount your fish finder in a way that holds up to the rigors of fishing trips and rough water. Wrap it all up.

Source Image: m.youtube.com
Download Image
Fishing Electrical Wire Through Walls | Home electrical wiring, Electrical wiring, Diy electrical Step 4: Testing it all out. Your transducer is secured, you’ve run all your wires up to your newly mounted fish finder, and you’re ready to take your new setup out on the water. Most of what we’ve done is fairly simple to reverse, so make adjustments if you need to. Enjoy your new setup, and happy fishing!

Source Image: pinterest.com
Download Image
Round Base Fish Finder Mount with Track Mounted LockNLoad™ Mounting System – Black – Ramsey Outdoor
Fishing Electrical Wire Through Walls | Home electrical wiring, Electrical wiring, Diy electrical To install battery wires, first, ensure that the battery is disconnected. Then, strip the insulation from the ends of the wires and attach them to the appropriate terminals on the battery. Finally, tighten the nuts on the terminals to secure the wires in place. Be sure to check the manufacturer’s instructions for your specific battery for any
Just another WordPress site | Surf fishing rigs, Fishing rigs, Surf fishing How to Install a Fish Finder | Pro Tips and Tricks for All Models – YouTube Mar 17, 2022Step 6 – Run The Power Cabling. Take the power cables and run them from your fish finder to your cranking battery/fuse box. Run them through the exit and entry holes you drilled in Step 4. Check to see if you need to shorten or lengthen the wires.